There are different ways by which you can make hoverboard at home. The material to make the hoverboards is easily available at home. Now, there is no need to worry to buy costly hoverboards. In fact, it is quite easy to make hoverboards at home.
Different ways to make hoverboards are:
1. How to make hoverboard at home
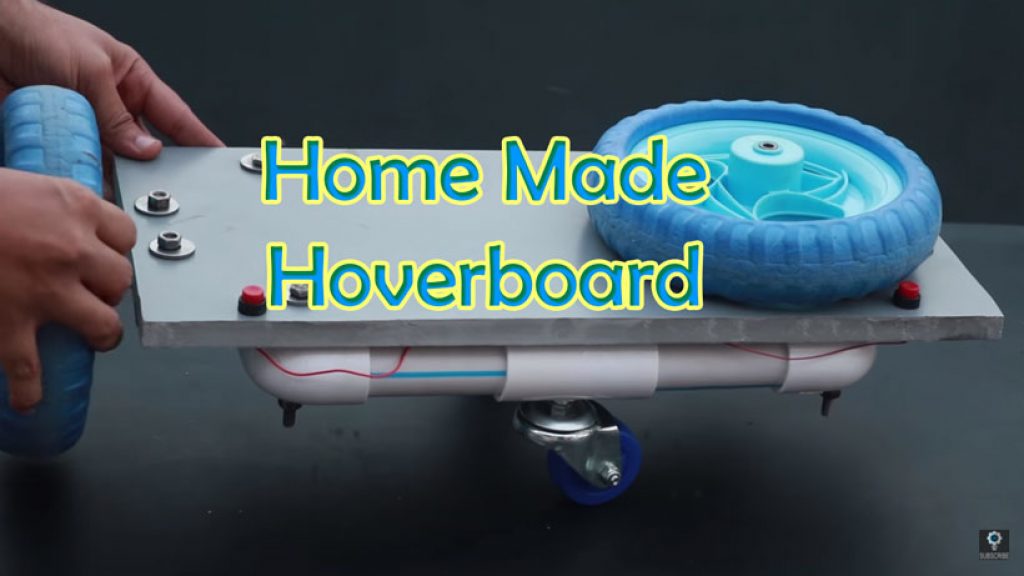
People with curious mind probably urge to build things. In fact, you can count engineers and other people as well who want something innovative. Apart from that, anyone of you can try some simple projects. Actually, it is not necessary to be engineer but eagerness and dedication is important. It is easy to make the hoverboard. In fact, you can find the material easily around you. After that, what you need to do is assemble the material correctly. For the main structure of the hoverboard, you need following things:
- Wood has needed to structure the hoverboard that houses all the electric connections.
- Two electric motors have attached to the wooden board. Then the motors have given connection with the two batteries.
- Two switches used to turn the motor on.
Of course, you have to make some sacrifices to make the project feasible. This includes an automatic switch and self-balancing mechanism. You can find self-balancing in the real product of the hoverboard, that is why it known self-balancing scooters. Apart from that, the extended wheels can give you more stability. The board on the board depends on the extended wheels. Then coming back to the control of the hoverboard, use your feet to engage the motors. In fact, in this homemade hoverboard, there is no chance of difficulty in riding and falling from the scooter because of the stability factor.
2. How to make an electric hoverboard to ride
You remember the hoverboard that usually everyone rides. Now, you can build your own electric hoverboard at home. You can through some simple steps that can guide you to make an electric hoverboard. Here is the list of materials you need to make the electric hoverboard at home.
[wpsm_box type=”info” float=”none” text_align=”left”]- 24 Volt Scooter motor-2 (check price)
- 12 Volt Battery-1
- 12 amp Battery-1
- 2”X2” Piece of Wood-1
- ½ Inch of Plywood-1
- ¼ Inch of Plywood-1
- Wood Glue-1
- Screws – (recommended)
- Epoxy
- Small rubber wheels-1” diameter
- Children Bike-12”wheels (recommended)
Steps to build the electric hoverboard for riding are:
-
Get the wheels
Firstly, you need to start with the wheels. You have to remove the wheels from the children bicycle. Once you have removed the wheels, then remove the all the nuts are bolts that are not required. In fact, you can take the useable axle if required.
-
Cut the frame
After removing the wheels of the cycle then cut out the frame from two thin pieces of the plywood. You have cut one thick piece of plywood. After that, you have three pieces of the plywood. However, the shape of the frame does not matter but the frame should be wide enough to fit your feet and the battery.
-
Slot for battery
Next step is to provide a slot for the battery. You have cut the thin pieces of the plywood. The pieces of the plywood should be in the square of the size of the battery.
-
Make hole for the wheels
In the next step after the providing slot for the battery, you have to make holes for the wheels. You have to drill the holes slightly bigger than the wheel’s axle into the end.
-
Attach the wheels
You can proceed by attaching the wheels to the holes respectively. Then fill each end with the epoxy for at least 1 minute inside the hole. However, avoid the use of the dollar store stuff in the electric hoverboard. Insert the screw the axels of the two bike wheels into each side. Then, keep for a day so that it becomes harder.
-
Assemble the frame
Assemble the wheels and the axle into the thin piece of the plywood. Further, you have to cut more pieces of 2X2 and attach them with the help of glue.
-
Continue by building the frame
In the next step, you have to build the bottom part of the hoverboard that holds the battery. Again, you have to use the same 2×2 thin pieces of the plywood to build the structure. Then, attach the bottom part of the frame to the middle part. Before, joining these parts you can remove the wheels that can make the work easier. In fact, you find that the beneficial to leave the epoxying wheels until the frame completely dry.
-
Attach balancing wheels
Then you have to attach a 2×2 piece off the back that can hold the rotating wheel. In fact, this back gives balance to your hoverboard.
-
Prepare the motor
In the next, step you have to move in preparing the motor. This is the friction drive so that motor can spin against the wheels. What you have to do is attach something that has high fiction onto the motor axels. For this, you can get a solid rubber wheel and then drill holes through the wheels and through the black belt gear on the motor axel. Then you have to apply epoxy to the wheel and attach to the motor axel. After that to secure this, you can use metal pieces of through the holes in the wheels into the holes and in the belt gear. You can get a rubber wheel from a dollar store that can be placed against the black rubber wheel attached earlier. Apart from that, a simpler alternative is wrapping the motor belt gear with the electrical tape.
-
Motor brackets
Now, you have to work on to build mounting brackets for the motors. In fact, this has used to hold the motor against the wheels. However, you have to build the motor brackets in such a way that it is long enough to hold the axle of the motor against the wheel. The back end of the brackets is used as a pivot point. Further, you can use the wooden piece or dowel off that can stick to the end. Therefore, this has used as an attachment in an elastic form.
-
Mounting brackets
In this step, you have to attach the motors with the help of duct tape. Glue and epoxy are not useful to hold the epoxy. While attaching the motors you have to make sure that wheel is at the end of the motor. Therefore, it can line up with the hoverboard wheels.
-
Wiring the motor
Then you have wired the motor in parallel with the battery. In addition to, you have to add a switch between each motor. This is useful to provide separate control to each motor.
-
Put the top on
After completing the wiring of the top of the hoverboard, then screw in the thicker piece of the plywood. However, you should use only the screws, not the glue.
-
Add Elastics
To finish off building the hoverboard, attach elastic bands from the motor’s bracket to the wheels axel. Therefore, this is useful in making the motor press against the wheel. However, it is difficult to press the motor against the wheel, so that the hoverboard can move while you are standing on it. For this purpose, you can add more elastics to it.
-
Finish
The task of making the hoverboard has completed. Now you can take the ride of hoverboard and enjoy it.
[wpsm_box type=”yellow” text_align=”left”] Have you decided to give up the idea of DIY? Check out the best hoverboards[/wpsm_box]
How to make the hoverboard from the Junk Material
- Our aim is use make the hoverboard. For this purpose, you can make the use of the old junk material. In fact, by using the junk material your purpose has fulfilled and the waste products are recycled. This, in turn, is useful for the environment. Therefore, you can take the motor and the batteries. Use the metal frame to get the shape of the hoverboard. Further, with the help of belt attach the metal sheet with the motor to provide electricity. You can use the inverter that can place on the metal sheet so that you can stand on the hoverboard.
- In fact, gyroscope sensor is necessary for the hoverboard. Without the gyroscope sensor, it is not possible to keep the balance on the hoverboard. Apart from the gyroscope sensor, you can use the small wheel to provide balance to the hoverboard. Another important thing is the hoverboard is the missing breaks.
Could you show me the end result, I am thinking about making a stand up board behind a push buggy!!!Thanks Norm(Golfwares) Australia